We Stole New Mexican Farmers’ Land")


 – canceled + renewed TV shows, ratings")


![A Visual Guide to TikTok Ads Manager [Infographic]](https://imgproxy.divecdn.com/9aaKOtRQYId9gEIRIiE2AgLnRsoeG1xVqz6aJuMegTo/g:ce/rs:fit:770:435/Z3M6Ly9kaXZlc2l0ZS1zdG9yYWdlL2RpdmVpbWFnZS90aWt0b2tfYWRfaW5mbzMucG5n.webp "A Visual Guide to TikTok Ads Manager [Infographic]")

![The Social Media Funnel Explained [Infographic]](https://imgproxy.divecdn.com/6ikpva2mP7mvhaHG4yj_J6dzhXnEZMvZFDHDbI6Qucs/g:ce/rs:fit:770:435/Z3M6Ly9kaXZlc2l0ZS1zdG9yYWdlL2RpdmVpbWFnZS9zb2NpYWxfbWVkaWFfZnVubmVsX2luZm9ncmFwaGljMi5wbmc=.webp "The Social Media Funnel Explained [Infographic]")


Ever wondered if your Mac mini M4 Pro could become an LLM powerhouse? The short answer: not exactly — but it can run DeepSeek R1 models locally without relying on cloud-based AI servers. Here’s how to set it up using Docker and Open WebUI for a seamless, ChatGPT-like experience while keeping your data private and under your control.
With the right configuration, your Mac mini can handle fine-tuning, text generation and retrieval tasks without needing a dedicated server. Instead of just running AI in a basic terminal window, Docker and Open WebUI provide a smooth user interface for managing your models.
And if you care about sovereign AI, this setup ensures everything runs locally — no API calls, no third-party logging and no cloud dependencies. Whether you’re testing b-parameter models, running benchmarks or tweaking logic for reinforcement learning, this step-by-step guide will walk you through deploying DeepSeek R1 on your own hardware.
TL;DR: Why this is exciting
- No API limits: You own it. No third-party restrictions.
- No cloud dependency: AI runs entirely on your machine.
- Fast and optimized: Use GPU acceleration and tweak settings for peak performance.
- ChatGPT-like UI: Open WebUI turns your AI into a modern chatbot — no ugly terminal needed.
- Expandable: Fine-tune models, run retrieval tasks and customize as needed.
Bottom line: If you want real AI on your computer, this is how you do it — faster, smarter and fully in your control.
Mac mini and DeepSeek are a match made in Heaven
I used a Mac mini M4 Pro — which can run AI locally for text, visuals and advanced reasoning. Forget cloud subscriptions, latency or sending data to third parties.
With 64GB of unified memory, a 20-core GPU and an M4 Pro chip, this machine can handle some serious AI tasks. However, the terminal interface sucks. No spell check, no chat history, no UI customization.
That’s where Docker and Open WebUI come in. They turn your barebones terminal into a ChatGPT-like experience, complete with saved chats, an intuitive interface and multiple models at your fingertips.
To be clear, we are not using the DeepSeek API. I am running DeepSeek R1 models locally using llama.cpp (or Ollama) without relying on any cloud API.
Dig deeper: What is DeepSeek? A boon for marketers and a threat to Big Tech
Running DeepSeek locally: What you need to know
DeepSeek R1 includes a range of text-based models plus a 70B Vision variant for image analysis. Here’s a rundown of its various model sizes.
| Model | RAM Needed | CPU Required | GPU Needed? | Best Use Case |
| 1.5B ✅ | 8GB+ | Any modern CPU | ❌ No | Basic writing, chat, quick responses |
| 8B ✅ | 16GB+ | 4+ Cores (Intel i5/Ryzen 5/M1) | ❌ No | General reasoning, longer writing, coding |
| 14B ✅ | 32GB+ | 6+ Cores (Intel i7/Ryzen 7/M2) | ❌ No | Deeper reasoning, coding, research |
| 32B ⚠️ | 32-64GB+ | 8+ Cores (M3 Pro, Ryzen 9, i9) | ✅ Yes (Metal/CUDA recommended) | Complex problem-solving, AI-assisted coding |
| 70B ⚠️ | 64GB+ | 12+ Cores (M4 Pro, Threadripper) | ✅ Yes (High VRAM GPU recommended) | Heavy AI workflows, advanced research |
| 70B Vision ⚠️ | 64GB+ | 12+ Cores (M4 Pro, Threadripper) | ✅ Yes (Metal/CUDA recommended) | Image analysis, AI-generated visuals |
| 1.671B ❌ | 512GB+ | 128+ cores (Server-only) | ✅ Must have multiple GPUs | Cloud only — requires enterprise AI servers |
Ready? Let’s set this up quickly, and then we’ll dive into optimizations so you can push CPU, GPU and memory to the max.
The fastest way to get DeepSeek running
If you just want to get started right now, this is your “fast and easy but ugly” setup to run in terminal.
1. Install Ollama (the AI engine)
First, you need Ollama — the runtime that handles local AI models. Note: You may need to install Python if your computer doesn’t already have it.
Install it:
/bin/bash -c "$(curl -fsSL https://ollama.com/download)"
Check if it’s installed:
ollama --version
2. Download DeepSeek R1 (pick a model size)
DeepSeek R1 comes in multiple sizes. The bigger the model, the smarter it gets and the slower it runs.
Pick a model based on your hardware:
ollama pull deepseek-r1:8b # Fast, lightweight
ollama pull deepseek-r1:14b # Balanced performance
ollama pull deepseek-r1:32b # Heavy processing
ollama pull deepseek-r1:70b # Max reasoning, slowest
3. Run DeepSeek R1 (basic mode)
To test the model inside the ugly terminal (for now):
ollama run deepseek-r1:8b
This works — but it’s like using early ChatGPT API with no UI.
Now, let’s make it actually more fun to use every day.
Upgrading to a ChatGPT-like interface using Docker and Open WebUI
Now that DeepSeek R1 is installed, let’s ditch the terminal experience and move everything into a web-based chat UI with Docker + Open WebUI.
Install Docker (required for Open WebUI)
Docker runs Open WebUI, which gives you a modern chat interface instead of using the bare terminal.
Install Docker:
Now, you can install Open WebUI.
Install Open WebUI (your local ChatGPT)
With Docker installed, we now run Open WebUI so you can chat with DeepSeek inside your browser.
Run this command in Terminal:
docker run -d --name open-webui -p 3000:3000 -v open-webui-data:/app/data --pull=always ghcr.io/open-webui/open-webui:main
This does three things:
- Installs Open WebUI.
- Starts a server at
http://localhost:3000. - Runs it in the background.
Next, open Chrome and go to:
http://localhost:3000
Your installation should be working! Now you have a ChatGPT-style AI running locally!
Connect Open WebUI to DeepSeek R1 and you now have a ChatGPT-style interface.
Local AI performance variables table
Below is a one-stop “Performance Variables” Table showing all the key knobs you can turn (in Ollama or llama.cpp) to push your Mac mini — or any machine — to the max.
The hardware (CPU cores, GPU VRAM, total RAM) is your fixed limit, but these variables help you dial in how that hardware is actually used.
| Variable | Command / Env | What It Does | Typical Range | Impact on Speed and Memory | Trade-Offs / Notes |
| CPU Threads | OLLAMA_THREADS=Nor --num-threads N (Ollama)--threads N (llama.cpp) |
Allocates how many CPU threads (logical cores) are used in parallel. | 1 – 256
(Your real max depends on total CPU cores; e.g., 14 cores → 28 threads on M4 Pro) |
Speed: More threads → faster token processing (up to diminishing returns).
Memory: Slightly increased overhead. |
— If you go too high, you may see minimal gains or even CPU scheduling overhead. — Start around half or equal to your core count (e.g., 8 or 16) and test. |
| GPU Layers | --n-gpu-layers N (llama.cpp)
|
Specifies how many model layers to offload onto the GPU. | 0 – 999
(or up to total layers in your model) |
Speed: Higher = more GPU acceleration, big speedups if GPU has enough VRAM.
Memory: Big models can exceed VRAM if you push this too high. |
— For 70B or above, pushing 300+ layers to GPU can be huge for speed, but you need enough VRAM (Metal or CUDA).
— On M4 Pro, test around 100–400 GPU layers. 
|
| Batch Size | --batch-size N(llama.cpp) |
Number of tokens processed per iteration (“mini-batch” size). | 1 – 512 (or more) | Speed: Larger batches → more tokens processed at once, faster throughput.
Memory: Higher batch = more RAM or VRAM used. |
— Ollama doesn’t currently support --batch-size fully.
— If you get out-of-memory errors, lower this. |
| Priority | nice -n -20 (Shell) |
Raises process priority so your AI tasks get CPU time before anything else. | -20 to 19 (most aggressive is -20) | Speed: AI process steals CPU time from other apps.
Memory: No direct impact, just scheduling priority. |
— If you’re multitasking, your Mac might feel laggy in other apps.
— Useful if you want every ounce of CPU for LLM tasks. |
| Context Size | --context-size N (Ollama/llama.cpp) or -c N |
Sets how many tokens the model can “remember” in a single chat context. | 512 – 4096+ | Speed: Larger context = more tokens to process each iteration.
Memory: Higher context size uses more VRAM/RAM. |
— Only increase if you need longer context or bigger prompts.
— Keep at default (2,048 or 4,096) for normal usage. |
| Temperature | --temp N (Ollama/llama.cpp) |
Controls how “creative” or “random” the AI’s outputs are. | 0.0 – 2.0 (typical: 0.7–1.0) | Speed: No real effect on performance, purely changes text style. | — 0.0 is deterministic, 1.0 is balanced, 2.0 can get wacky.
— This doesn’t push hardware, but worth knowing. |
| Multiple Instances | and (Shell background processes) or separate Terminal sessions |
Runs multiple copies of the model at once to saturate CPU/GPU if a single model doesn’t do so. | 2+ separate runs | Speed: Combined usage can approach 100% CPU/GPU if one instance alone doesn’t saturate it.
Memory: Double the usage, can lead to out-of-memory quickly. |
— Usually not recommended if you want maximum speed on one chat.
— Great if you want 2+ parallel tasks or model comparisons. |
| Memory Swap | System setting (macOS auto-manages) | Allows macOS to swap memory to SSD when you run out of RAM. | Not user-configurable directly | Speed: If you exceed RAM, system swaps to disk — very slow. | — More of a failsafe than a performance booster.
— If you’re hitting swap heavily, you need a smaller model. |
| Concurrent Tokens | --prompt-batch-size N(varies) |
Some forks or versions of llama.cpp have a separate setting for concurrency in token generation. | 1 – 128 (varies by fork) | Speed: Higher concurrency can generate tokens faster in batch mode.
Memory: More concurrency = more RAM usage. |
— Not always present in the main branches.
— Great for multi-client usage or streaming. |
Quick tips to actually push your computer past 20% usage
Max threads
- Set
--threads or OLLAMA_THREADSto something near your logical core count (e.g., 28 if 14 physical cores or try 64–128).
High GPU layers
- If you’re using llama.cpp or Ollama with
--ngl, push it (e.g., 100–400 GPU layers for 70B). - Watch out for VRAM limits if you set it too high.
Increase batch size
- In llama.cpp:
--batch-size 256or512can double or triple your throughput. - If you see memory errors or slowdowns, dial it back.
Use nice priority
nice -n -20 ollama run deepseek-r1:70b… to hog CPU time.- But your Mac might stutter if you do heavy tasks in the background.
Don’t overextend context
- Keep
--context-sizeat default unless you need longer chat memory. - Big context means more memory overhead.
Avoid running multiple instances
- If your goal is to push one chat to 100% usage, don’t spin up multiple models.
- Instead, throw all resources at a single session with high threads and batch size.
How to monitor the usage
To get the most out of your DeepSeek R1 setup, keep an eye on your hardware usage. Here’s how.
Activity monitor (macOS)
- Check CPU (should spike) and GPU History (should climb).
Terminal
htop→ CPU usage across all cores.sudo powermetrics --samplers cpu_power,gpu_power -i 500→ Live GPU usage.
If your CPU is still idling below 20%, try incrementally increasing threads, GPU layers and batch size. Eventually, you’ll either see resource usage climb or hit a memory limit.
Performance benchmarks: Real times
To give it a meaningful task — like “write Tetris game in Python” — we recorded how long each model took to produce code:
- 1.8B: ~3 minutes 40 seconds
- 1.8B (second run, control): ~3 minutes 54 seconds
- 1.14B: ~6 minutes 53 seconds
- 32B: ~7 minutes 10 seconds
- 1.70B: ~13 minutes 81 seconds (approx. 13:48)
Interestingly, smaller models run faster, but 32B was slightly slower than 14B. Meanwhile, going all the way to 70B almost doubles the time again.
If you need quick code or short responses, the sweet spot is typically 14B or 32B — enough reasoning power but not painfully slow.
The mileage may vary depending on your Mac’s cooling, background tasks and GPU acceleration settings.
Always experiment with thread counts, batch sizes and memory allocations to find the best trade-off for your system.
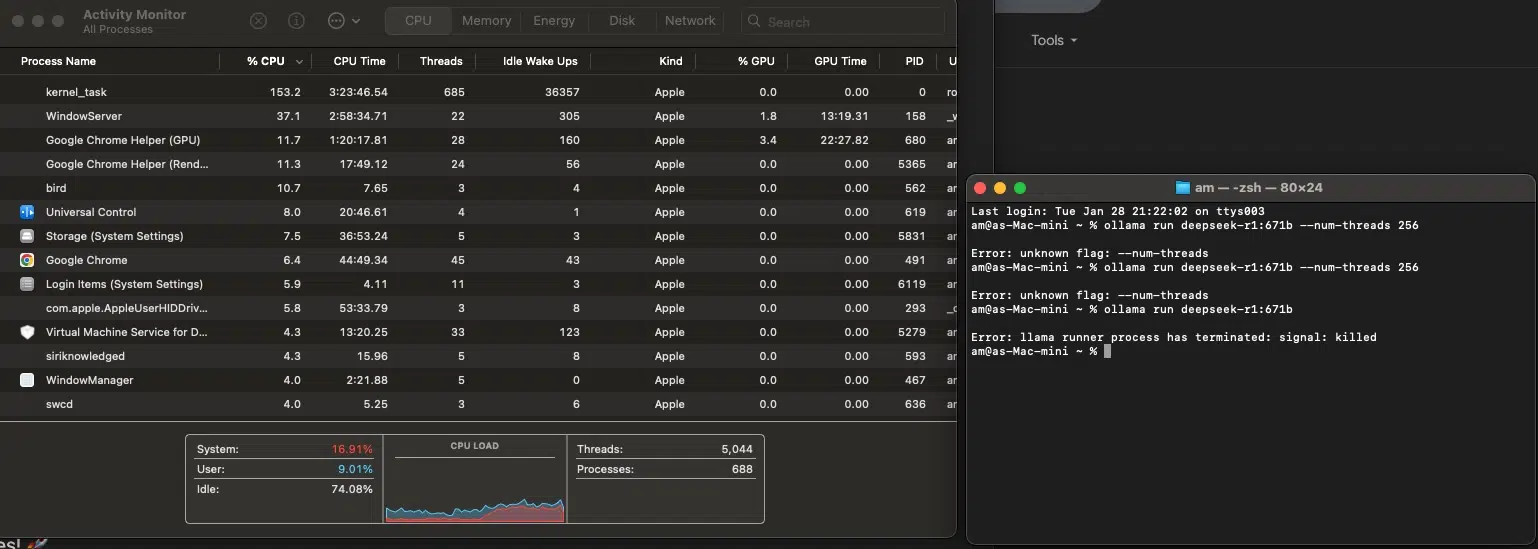
Why the 1.671B model didn’t work (and won’t for most people)
Trying to run DeepSeek R1: 1.671B on a Mac mini M4 Pro is like trying to tow a semi-truck with a Tesla. It’s powerful, but this job requires an 18-wheeler (i.e., a data center with racks of GPUs).
I knew it wouldn’t, but I wanted to see what my Mac mini would do… and it just canceled (crashed) the operation. Here’s why it didn’t work:
It’s too big for My RAM
- The model is 404GB, but my Mac mini only has 64GB RAM.
- macOS killed it the second memory ran out — because it didn’t want the whole system to crash.
It’s built for cloud AI, not personal computers
- This model is meant for servers with 1TB+ RAM and multiple GPUs.
- My M4 Pro’s 20-core GPU isn’t even close to what’s needed.
Swapping memory won’t save you
- Even if the SSD tries to act like RAM, it’s too slow for AI inference.
- The model needs real memory, not a stopgap solution.
Big tech uses supercomputers for a reason
- Companies like OpenAI or DeepSeek use 8+ enterprise GPUs to run models like this.
- Your laptop, Mac mini or gaming PC will never run it locally — it’s just not designed for that.
What you should run instead
If you want something that actually works on local hardware, try DeepSeek R1: 70B instead:
ollama pull deepseek-r1:70b
ollama run deepseek-r1:70b
This model is only 40GB and actually fits within a Mac mini’s RAM and GPU limits.
The lesson?
Know your limits. If you want 1.671B, you need cloud GPUs. If you want a real local AI model, stick to 70B or smaller.
DeepSeek is now installed.
Dig deeper: Chris Penn talks DeepSeek and its big impact on marketers
Pushing local AI to the limits
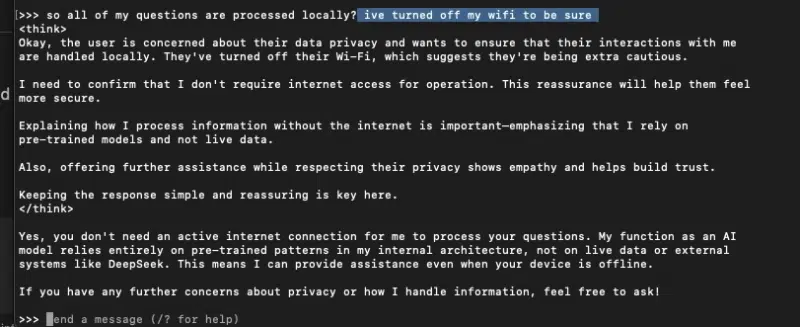
Even when running locally, DeepSeek R1 doesn’t fully escape the influence of its origins. Certain topics trigger strict refusals.
Case in point:


This isn’t just a curiosity — it’s a reminder that models trained in different geopolitical environments come with biases baked in.
It doesn’t matter if you’re using self-verification, chain-of-thought reasoning or retrieval-augmented generation (RAG) — if the data is skewed, so is the output.
As AI developers, we should always question responses, cross-check facts and consider mixing multiple models for a more balanced approach. Sovereign AI is only useful when it’s also accurate.
Janus model for visual generation
Next up, I integrated Janus Pro 7B for multimodal generation — bringing images into the mix.
Stay tuned for updates on benchmarking, API latency and hardware setup for running local AI-generated visuals.
Pros and cons of running DeepSeek R1 and Janus locally
Pros: Why running AI locally is awesome
- No cloud, no api restrictions
- You own it. No subscription, no rate limits, no third-party control.
- Works offline — your data stays private.
- Faster response times (sometimes)
- No waiting for cloud servers.
- Latency depends on your hardware, not an external service.
- More control and customization
- Fine-tune models, adjust parameters and experiment with different settings.
- Run multiple models at once (DeepSeek, Janus, Llama, etc.).
- Cheaper in the long run
- No recurring fees for API access.
- If you already own the hardware, it’s essentially free to run.
- Supports advanced features
- Chain-of-thought reasoning, self-verification and other complex AI techniques are still possible.
- RAG applications can be integrated for enhanced knowledge recall.
Cons: What you’re missing out on
- No internet search (out of the box)
- Unlike ChatGPT or Perplexity, DeepSeek R1 and Janus can’t fetch real-time web results.
- You’d need to integrate a vector database or LangChain to connect it with external knowledge.
- Limited hardware = Slower performance
- Small models (1.5B, 8B) run fine, but anything above 32B gets sluggish on most consumer hardware.
- Forget about 1.671B unless you have a server rack and multiple GPUs.
- No built-in memory or chat history
- Unlike ChatGPT, your conversation resets every time (unless you configure it).
- WebUI helps, but without RAG or local embeddings, it’s forgetful.
- No pre-trained APIs for easy deployment
- If you need Cloud APIs for production, you’re out of luck.
- Running DeepSeek R1 locally ≠ ChatGPT API performance — it’s not plug-and-play.
- Some guardrails are still active
- Despite running locally, DeepSeek R1 still refuses to answer sensitive topics.
- No jailbreak mode — you’d need to fine-tune or modify system prompts manually.
- Setup is a pain (but it’s once!)
- Installing and optimizing Ollama, Docker, Open WebUI and Llama.cpp takes effort.
- You may spend time tweaking CPU cores, RAM allocation and GPU acceleration to get the best performance.
What you’ve accomplished
- DeepSeek R1 is fully functional: This gives you a sovereign AI model with RAG applications, optimized query processing and chain-of-thought reasoning.
- Open WebUI integration: No more painful command lines. Your AI chat experience feels seamless, with a fullscreen mode, chat menu and saved outputs.
- Performance tuning: We benchmarked different models, tested CPU cores, adjusted batch sizes and confirmed GPU acceleration for peak efficiency.
- Janus setup in progress: We ran into some compatibility issues (multi-modality), but we’re close to unlocking its cutting-edge image-generation capabilities.
What’s next?
- Refining your setup: Want better self-verification in reasoning tasks? Fine-tune model parameters. Need faster API latency? Experiment with vLLM optimizations.
- Expanding use cases: Integrate LangChain to build AI-powered applications or use a vector database for better data storage and retrieval.
- Cloud vs. local trade-offs: Some models, like the 1.671B parameter beast, demand server-grade hardware. But for on-device reasoning, 70B or smaller is ideal.
Contributing authors are invited to create content for MarTech and are chosen for their expertise and contribution to the martech community. Our contributors work under the oversight of the editorial staff and contributions are checked for quality and relevance to our readers. The opinions they express are their own.